This section describes how to set up a Sales Funnel Template
- Go to Sales > Sales Admin > Funnel Administration and click the ADD icon.
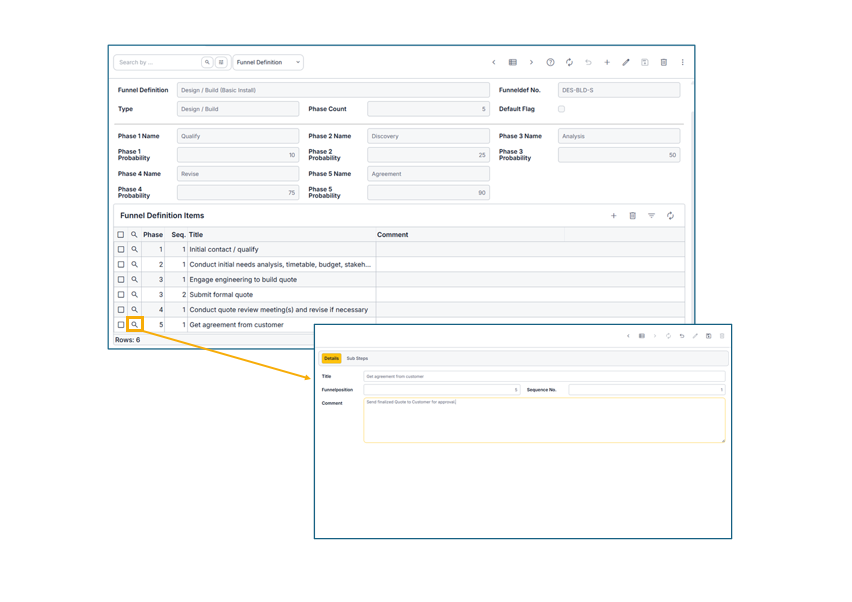
- Fill in Funnel details on the Funnel form > Funnel tab
- Funnel Definition: input a distinct name for this Sales Funnel
- Type: select from drop-down list based on values defined by General Code FUNNTYPE
- Phase Count: specify the number of phases to be defined in this Sales Funnel. Default value = 1
- Default Flag: select the checkbox to define this as the default funnel to display from Sales Main Menu > Quick Views > View Funnel
- Funneldef No.: this number is automatically assigned by the system
- Set up each phase (to a maximum of 9 phases) for this Sales Funnel
- Associate a Probability % to represent the likelihood of the Sales Opportunity closing, where the higher the phase completed, the higher the probability
- The % probability input for each phase needs to include cumulative probability of any phases previous to it; and be less than 100 (since a value of 100 would indicate a certainty in closing the Sale)
- Click the Save icon to save the phase. The Funnel Definition Items grid will appear.
- For each phase, define at least one step, i.e. a Funnel Definition Item
- On the Funnel Definition Items grid, click the Add icon and define its attributes in the “Funnel Def Item: Add” window that appears:
- Title: input the name of this step
- Funnel Position: specify which phase this step belongs to
- Sequence No.: specify the numbered sequence this step exists as part of this Funnel
- Comment: optionally add more text details as necessary
- Click the Save icon to save this step
- Repeat for as many steps as needed for this phase
- On the Funnel Definition Items grid, click the Add icon and define its attributes in the “Funnel Def Item: Add” window that appears:
Suggestion: as a next step, your administrator may configure this sales funnel definition to a Sales Opportunity interest