This article provides information on how to take advantage of “Calculated Fields” when building a Live Data Report.
When creating or editing a Live Data Report, Calculated Fields can be a powerful tool when you want to take data from one or more fields in a report and use it to programmatically create a new field. You can use calculated fields for various items such as mathematical calculations, data format conversion, manipulating dates or producing a value based on some “If…Then” logic.
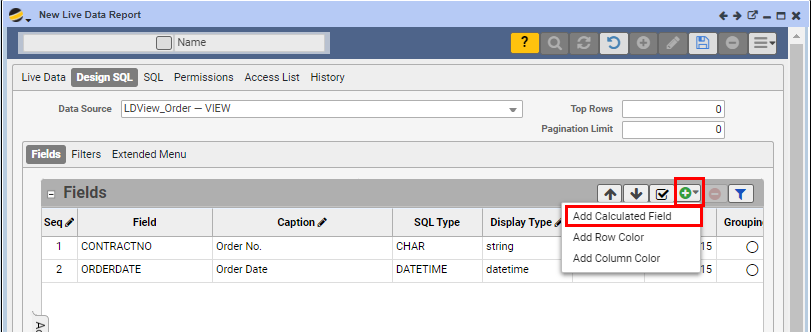
To add a Calculated Field to your report, open your desired report in the Live Data Report Designer and click on the Design SQL tab, put the form in edit mode, then click the plus button and select “Add Calculated Field”.
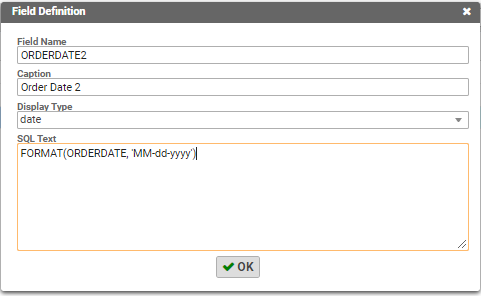
In the corresponding “Field Definition” form, enter the following information:
Field Name: The Name of the field you are creating; it must be unique to any other fields in the Data Source used. It may not have spaces or any special characters.
Caption: The label for the column that will be displayed in your report.
Display Type:
- String: A combination of any characters that appear on a keyboard, such as letters, numbers and symbols.
- Money: Monetary data
- Numeric: Numbers with or without decimals.
- Percent: Percentages
- Checkbox: Yes or No values
- Date: Date only. If the value includes time, it would be omitted.
- DateTime: Date and Time values
- Hidden: Not displayed in the report
In the SQL Text Field, you can enter your calculated field which can take advantage of many SQL functions. You can use any “Field” listed in your report as long as it supports your desired syntax. Once complete, click OK and the field is now added to the report.
Some of these functions are listed here, however, this is not an all inclusive list.
| Mathematical : | + Add – Subtract * Multiply / DivideExample:(FIELD1 – FIELD2) |
| Get Date: | Get the current date and time from the Q360 Server dbo.fngetQDate(‘SYSTEM’, ”) |
| Date Format: | FORMAT(DATEFIELD, ‘MM-dd-yyyy’) |
| Date Formatting Options: | |
| dd – day of month from 01-31 | |
| dddd – day spelled out | |
| MM – the month number from 01-12 | |
| MMM – month name abbreviated | |
| MMMM – the month spelled out | |
| yy – the year with two digits | |
| yyyy – the year with four digits | |
| hh – the hour from 01-12 | |
| HH – the hour from 00-23 | |
| mm – the minute from 00-59 | |
| ss – the second from 00-59 | |
| tt – shows either AM or PM | |
| d – day of month from 1-31 | |
| Date Add: | DATEADD(interval, X, DATEFIELD)
Example: |
| Date Difference: | DATEDIFF(interval, DATEFIELD1, DATEFIELD2)
Example: |
| CASE Statement: | CASE WHEN FIELD1 = {Condition 1} THEN {RESULT1} WHEN FIELD1 = {Condition 2} THEN {RESULT2} ELSE {RESULT3} END |
| Percentage Function: | dbo.fnReturn_Percentage(FIELD NUMERATOR, FIELD DENOMINATOR) |
| String Functions: | UPPER(FIELD) – Converts string to uppercase LOWER(FIELD) – Converts string to lowercase LEFT(FIELD, X) – Extracts X number of characters, beginning at the left of the string RIGHT(FIELD, X) – Extracts X number of characters, beginning at the right of the string |
| IIF Function: | IIF(expression, value if true, value if false) – Returns first value if a condition is TRUE, or another value if a condition is FALSE |
| String Functions: | UPPER(FIELD) – Converts string to uppercase |
| URL Links: |
Use Display Type of STRING and enclose your URL, using standard attributes . Example: ‘<a href=”https://www.google.com” target=”_blank”>Click Here</a>’ You can also use the “+” to add fields from the report into your URL |
ADVANCED TOPIC: Coloring cells
To add color to a cell in a report that is conditional based on your chosen conditions, you need to add a calculated field as follows:
- Add a new calculated field
- Under field name, enter “Resq_ColumnName_Color”, where ColumnName should be the name of the column (field) you want to enrich with background color. For example, if you had a field named STATUSCODE, your calculated color field would be Resq_STATUSCODE_Color. This also works to reference names of other calculated fields you may have added to your report
- For caption, we recommend using the same value as Field Name
- Choose a Display Type of “Hidden”
- In the SQL Text box, enter code such as the following. For full list of available color options, you can reference possible values from lists such as the one found in Quote > Line Items > Add Section > Section tab > Color dropdown
CASE WHEN STATUSCODE = 'DATAENTRY' THEN 'LTGRAY'
WHEN STATUSCODE = 'PICKED' THEN 'LTYELLOW'
WHEN STATUSCODE = 'SHIPPED' THEN 'LTGREEN'
ELSE ''
END
ADVANCED TOPIC: Adding a non-pre-defined Zoom Field
If you understand the name of the form or report that you would like to zoom into, you can also add a zoom column to the report even when that zoom is not defined in the Live Data view. This is the column denoted by the magnifying glass in the Q360 grid.
- Add a new calculated field
- Under field name, enter “RESQ_ZOOM_FORM”
- For caption, we recommend using a ” . ” to be consistent with other Q360 reports
- Choose a Display Type of “String”
- In the SQL Text box, enter your zoom form code:”
'<ZoomForm WebAction="sqlview"
WebParamNames="report,param1"
WebParamValueFields="Q0063,'+TRANNO+',"
WebDisplayValue=""> </ZoomForm>'