Easily choose from multiple signatures with one click when sending mail from the new Webmail client within Q360.
Setup multiple signatures
- Go to User Name (top right corner of Q360 main page) > User Preferences > Email Preferences Tab.
- Click the User Preferences form Edit icon.
- Within the Signature grid, click on the Add+ button. If you have not entered EDIT mode by this point, you will be directed to do so.
- A “New Signature” line will appear in the Signature grid. There are two editable fields on this line—Name and Signature.
- Edit the Name field by double-clicking within the field you wish to edit. Type directly into the Name field.
- Edit the Signature field. Double-clicking within the Signature field will open a pop-up window to paste a pre-made signature or create a new one. Standard font, styling, hyperlinking and organization options (similar to Microsoft Word) are available.
- Click Update to add your new signature to the Signature grid.
- Click the Save icon in the main User Preferences window to add your multiple signatures as options for use within Webmail.
Using multiple signatures:
- To use Webmail, click on an email icon hyperlink within a form.
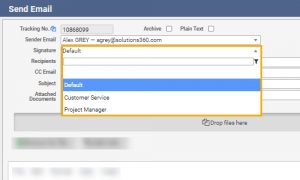
- The email form will open with your sender email populated. If you have multiple signatures defined (as above), a signature field will be visible with your default signature selected.
- In order to choose a different signature for this email, click on the signature drop down list and choose the signature you wish to use. You will see the signature change within the email text box below.
- For general instruction regarding Email Queue set up for integration purposes, refer to Email Queue Setup for Webmail.