This topic describes how to view, build, and administer workflows in the Q360 Web Client.
Create new workflows from scratch
View workflows as an end user

Workflows are located in the Workflow main menu. When a workflow is open, users will see the following details.
Buckets
Each workflow diagram contains buckets with names describing the buckets and numbers to indicate how many records are visible to the user. Depending on the type of access that a user has within the system, the number count will vary. Such factors include visibility of branches, companies (entities), etc.
Filter tab
Workflow diagrams also display a Filter tab to the side of the diagram. This allows users to change and refine details that display in the buckets including user IDs, branches, companies, date ranges, and record ID numbers.
Grant user access to workflows
Access to workflows are administered in two locations.
- User ID form – To allow users to view the Workflow main menu, the WORKFMENU view permission must be assigned
- Workflow – Specific workflow access must be designated by going to Workflow > Workflow Definitions, opening up the specific workflow and assigning permission in the Permissions tab. This location also allows you to specify whether or not the user can open bucket details.
Also not the following additional permission options:
- WORKFLOWDEF allows users to view the Workflows > Workflow Definition menu option as well as control create, edit, delete, and execute workflow changes
- WORKFLOWSQL allows users to use the Workflow form extended menu option Export Workflow, which allows users to export a workflow to XML format. Also note that this permission is not automatically granted to ADMIN type users and must be manually assigned.
For more information about user permissions, see the topic Permissions.
Create workflows from a copy

Copying an existing workflow to create a new workflow can help to save time and effort. Use the following steps to copy a workflow to create a custom workflow:
- Go to Workflows > Workflow Definitions, and open the workflow you want to copy.
- Click the extended menu icon and select Copy Workflow. A new workflow opens in edit mode with all of the bucket, filter and permissions contained in the copied workflow.

- Click the Workflow tab, change the Title field to the name you want to assign to the new workflow.
- Click the Filters tab to view and change the details for the new workflow, based on the live data set used for the buckets. Clicking on an editable field will display the options available, based on the selected live data set.
- Click the Permissions tab and adjust the permissions required for this workflow.
- Click the Save icon to save the copied workflow changes. In order to change specific bucket details in the Diagram tab, the main Workflow form must be in read-only mode.
Use the following steps to modify the buckets in a copied workflow:
-
- From the Workflow form, click the Diagram tab
- Click the lower Edit icon. Note that if the greater workflow form is in edit mode, you cannot edit the diagram.
- Click the bucket you want to modify the properties in the right hand section. The properties are as follows:
ARRANGE Displays the coordinates for the bucket location on the diagram. You can adjusting these coordinates manually or simply drag the bucket to the desired location on the grid. FILL Allows you to change the color of the selected box. CONTENT Displays the content type (usually [WF:COUNT]) as well as the assigned name for the bucket. STROKE Allows you to change the color and weight of the border for the selected bucket.
Also note that the STROKE option also apply to the lines that connect the buckets, when selected.
- In addition to the side properties, there are options that display directly above a selected bucket.
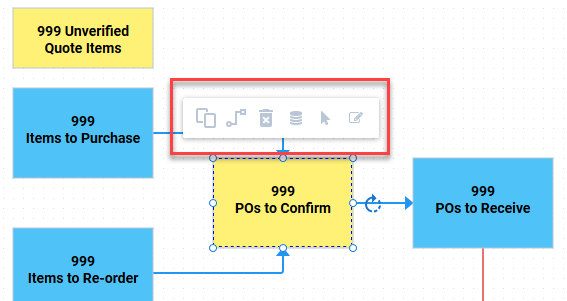
Copy icon Creates a copy of the selected bucket to the grid, including bucket configurations. Line icon Add a line from the selected bucket to a another specified bucket. Delete icon Deletes the selected bucket from the grid. Data icon Opens a windows that displays the currently selected live data source. This can be changed to another live data source. Move icon Moves the selected bucket or line to the selected location on the grid. Edit icon Change the shape of the bucket to reflect the kind of data contained within the bucket. - Click the Save icon.
Building a new workflow from scratch

Use the following steps to create a brand new workflow:
- Go to Workflows > Workflow Definitions.
- Click the Add icon. A new Workflow form displays.
- In the Workflow tab, Title field, enter a name for the workflow.
- Click the Filters tab to view and change the details for the new workflow, based on the live data set used for the buckets. Clicking on an editable field will display the options available, based on the selected live data set.
- Click the Permissions tab and add the permissions required for this workflow.
- Click the Save icon to save the workflow changes. In order to add and configure bucket details in the Diagram tab, the main Workflow form must be in read-only mode.
Use the following steps to add and configure buckets in a workflow:
-
- From the Workflow form, click the Diagram tab
- Click the lower Edit icon. Note that if the greater workflow form is in edit mode, you cannot edit the diagram.
- From the SHAPES panel, select and drag a shape onto the grid.
- Click the added bucket you want to modify the properties in the right hand section. The properties are as follows:
ARRANGE Displays the coordinates for the bucket location on the diagram. You can adjusting these coordinates manually or simply drag the bucket to the desired location on the grid. FILL Allows you to change the color of the selected box. CONTENT Displays the content type (usually [WF:COUNT]) as well as the assigned name for the bucket. STROKE Allows you to change the color and weight of the border for the selected bucket.
Also note that the STROKE option also apply to the lines that connect the buckets, when selected.
- In addition to the side properties, there are options that display directly above a selected bucket.
Copy icon Creates a copy of the selected bucket to the grid, including bucket configurations. Line icon Add a line from the selected bucket to a another specified bucket. Delete icon Deletes the selected bucket from the grid. Data icon Opens a windows that displays the currently selected live data source. This can be changed to another live data source. Move icon Moves the selected bucket or line to the selected location on the grid. Edit icon Change the shape of the bucket to reflect the kind of data contained within the bucket. - Click the Save icon.
Workflow form reference
Title
Assigned title for the workflow.
Description
Assigned description for the workflow.
Category
Workflow main category. Options that display are configured in the general code WRKFLWCAT.
Sub Category
Workflow sub-category. Options that display are configured in the general code WRKFLWSUB.
Main Menu Path
Indicates where in the main menu to make the workflow available.
Auto Refresh
The frequency to refresh the workflow for the end user viewing a the workflow.
Workflow No.
The automatically assigned record number. This field is not editable.
Public Flag
All users with WORKFMENU can view the workflow. Also if the Main Menu Path is specified, users with access to the location can view the workflow.
Created By
The user ID that created the workflow. All workflows listed as Q360 are core workflows and cannot be edited.
View Workflow button
Displays a preview of the workflow for verifying changes.